My first gunsmith bench was a pile of used bathroom cabinets with a sheet of scrap wood on top. It worked, but barely. The surface wobbled, drawers stuck, and I spent more time looking for tools than fixing guns.
Eventually, I graduated to a solid kitchen table I found at a secondhand store for eighty bucks. That table changed everything. It was heavy, flat, and stable. I still use it today even though I’ve built an entire studio around it.
That’s how most good setups start. You take what you have, figure out what doesn’t work, and keep upgrading the parts that matter.
Start Small and Build Around It
You don’t need a professional bench to start gunsmithing. You just need a place that stays consistent. A cheap table or heavy work surface is fine. Add a rubber mat, a bright light, and keep it clean. That’s your bench.
Just don’t use the family kitchen table. That ends badly every time.
Learning Order the Hard Way
My first bench was chaos. Tools scattered, parts rolling, lighting awful. The day I divided my space into three zones (prep, work, and inspect), It stopped feeling like a fight.
When you control the layout, the work slows down and smooths out. The gun stays where you put it. Springs stop disappearing. You start thinking instead of reacting.
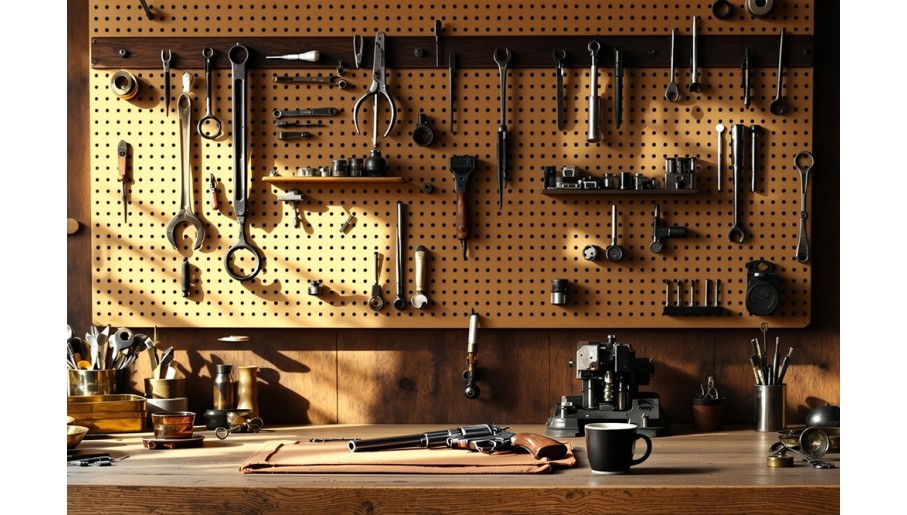
The Tools That Built My Second Bench
Here’s what I used to turn that secondhand table into something real:
- Used kitchen table — $80
- Rubber mat — $20
- Brass and roll-pin punch set — $30
- Bench block — $15
- Small vise with soft jaws — $60
- LED lamp — $35
- Light hammer — $25
- Screwdriver set — $50
- A few trays and bowls — $15
Less than $330 total. Nothing fancy. Everything earned its keep.
Sure, high-end tools are nice. I’ve got plenty now. But when you’re learning, a reliable budget tool beats a premium one that scares you to use it. The trick is knowing what to save for and what to replace later.
Where to Spend and Where to Save
Spend money where contact happens. Your vise, lighting, and screwdrivers need to work right every time. Buy used when you can but buy solid.
I still check garage and estate sales whenever I can. I once picked up a used Dan Wesson barrel nut tool for two dollars. It sells online for seventy-five. Right next to it were front sight inserts for another two. I could have flipped both and made a profit, but that’s not why I buy them. Tools like that belong in the shop, not a shipping box. Over the years I’ve found some great used tools the same way. Patience and a good eye build a better bench than any catalog.
Save money on mats, trays, and storage. Pawn shops and classifieds are full of gear that just needs cleaning. A good tool doesn’t have to be new. It just has to work without damaging parts.
Habits That Keep the Bench Working
- Keep the same layout every session.
- Use magnetic strips for drivers and pliers.
- Label bins for small parts.
- Ventilate when you use solvent.
- Keep a first aid kit close.
- Always wear safety glasses.
The more consistent your setup, the cleaner your work. Every motion gets shorter. Every fix gets faster.
What Stuck With Me
A stable bench, bright light, and organized tools beat any high-end setup when you’re learning. My bathroom cabinet bench taught me frustration. The kitchen table taught me efficiency. The rest came with time.
That same table sits in the studio today. I still do filming on it for some of my videos. It even has my Real Avid vise mounted to it. Sure, it’s surrounded by better tools now, but it still does real work. Scratched. Stained. Steady.
If you want to learn more about DIY Gunsmithing, check out my website at www.trb.fyi.
This information is provided for educational purposes only. We recommend consulting a professional gunsmith for any repairs, rebuilds, or modifications.
Author Bio
Jason Schaller has over 40 years of shooting experience and spent a decade as a licensed FFL gunsmith. Long before “DIY gunsmithing” was a buzzword, he was fixing and rebuilding firearms on his own bench. Today, he runs The Rogue Banshee, where he shares step-by-step guides that help everyday gun owners keep their firearms running and build confidence in their own skills. Visit him at www.trb.fyi, or on social networks like:


